
What is Live View Shooting?
Live View Shooting refers to the feature in digital cameras that allows photographers to use the camera’s LCD screen or a connected device (like a computer or smartphone) to preview what the camera’s sensor sees in real time before taking a photo. This contrasts with traditional shooting methods, where the photographer typically looks through an optical viewfinder to compose the shot.
Key Points About Live View Shooting:
- Real-Time Preview:
- Live View displays a live feed of the scene as captured by the camera’s image sensor. This allows photographers to see exactly what the final image will look like, including aspects like exposure, depth of field, and color balance.
- Improved Composition and Framing:
- Since you can see the entire frame on a larger screen, it’s easier to compose your shot, adjust the positioning of elements, and ensure that the framing is perfect.
- Focus Accuracy:
- Live View often provides more precise focusing, especially when combined with features like focus peaking or magnification, which zooms in on the subject to help fine-tune focus. This is particularly useful in macro photography or other situations requiring critical focus.
- Exposure Simulation:
- Live View can simulate the exposure settings, allowing you to see how changes in aperture, shutter speed, and ISO will affect the brightness of the image before you take the shot.
- Silent Shooting:
- In some cameras, Live View enables silent shooting modes, where the camera can take a picture without the noise associated with the mirror flipping up (in DSLR cameras).
- Remote Shooting:
- When used with software like EOS Utility, Live View allows for remote shooting, where you can control the camera from a computer or mobile device, see the live preview, adjust settings, and capture images without physically touching the camera.
Applications:
- Studio Photography: Provides precise control over composition and lighting.
- Macro Photography: Assists in achieving sharp focus on small subjects.
- Product Photography: Enables accurate and detailed composition for product shots.
- Video Shooting: Offers a clear view of framing and focus in video mode.
How Live View Shooting Works in EOS Utility
1. Overview of Live View Shooting:
- Live View Shooting allows you to see a real-time feed from your camera’s sensor directly on your computer screen via EOS Utility software. This is particularly useful for precise framing and focusing, remote control of camera settings, and shooting in studio or macro environments.
2. Setting Up Your Camera and Computer:
- Connect Your Camera: First, connect your Canon camera to your computer using a USB cable. Ensure the connection is secure and that the camera is turned on.
- Install EOS Utility: Make sure you have the EOS Utility software installed on your computer. It typically comes with the camera or can be downloaded from Canon’s website.
- Launch EOS Utility: Open the EOS Utility software. The software should automatically detect your connected camera.
3. Activating Live View Mode:
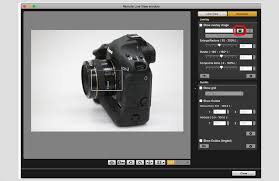
- Access Camera Settings: In EOS Utility, navigate to the ‘Remote Live View Shooting’ option. This is usually found in the main window or under the ‘Camera settings/Remote shooting’ tab.
- Start Live View: Click on the ‘Start Live View’ button. This will initiate a live feed from your camera and display it on your computer screen.
4. Viewing the Live Feed:
- Real-Time Preview: The Live View feed provides a real-time preview of what the camera’s sensor sees. This allows you to adjust your composition and settings while viewing the results instantly.
- Zoom and Focus Controls: You can zoom in on the live feed to check focus more precisely. Use the focus tools within the software or manually adjust the camera’s focus.
5. Adjusting Camera Settings Remotely:
- Exposure Settings: Use the EOS Utility interface to adjust settings such as shutter speed, aperture, and ISO. The software interface typically includes sliders or input fields for these adjustments.
- White Balance and Other Settings: You can also modify white balance, picture styles, and other camera settings through the software.
6. Taking Photos:
- Capture Image: Once you’ve composed your shot and adjusted settings, use the software’s capture button to take the photo. The image will be saved directly to your computer or specified storage location.
- Review and Adjust: After capturing, you can review the photo and make further adjustments if needed, either in real-time or before taking another shot.
7. Additional Features:
- Grid Display: EOS Utility may offer options to overlay grids or guidelines to assist with composition.
- Live Histogram: Some versions of the software include a live histogram to help with exposure adjustments.
8. Troubleshooting:
- Connection Issues: Ensure all cables are properly connected and the camera is turned on. Restarting the software or reconnecting the camera may resolve connectivity problems.
- Software Updates: Ensure that both your camera firmware and EOS Utility software are up to date to avoid compatibility issues.
Features of Live View Shooting in EOS Utility
-
Real-Time Display
- Description: Live View allows you to see a real-time feed from your camera’s sensor on your computer screen. This display shows exactly what the camera sees, providing an accurate preview of the shot.
- Benefit: This feature helps you frame and compose your shot precisely, making adjustments on the fly without having to rely solely on the camera’s viewfinder or LCD screen.
-
Remote Control
- Description: EOS Utility enables you to control various camera settings directly from your computer. This includes adjustments to shutter speed, aperture, ISO, white balance, and other settings.
- Benefit: This feature is especially useful in studio environments where the camera is positioned in hard-to-reach places, or when working with a tripod, allowing for more convenience and precision.
-
Focus Control
- Description: You can control the camera’s focus remotely, including both autofocus and manual focus options. You can also use the computer to select the focus point on the live feed.
- Benefit: This feature improves focus accuracy, particularly for macro or still-life photography, where precise focusing is crucial. It also allows for fine-tuning without physically interacting with the camera.
-
Exposure Simulation
- Description: Live View provides a real-time preview of exposure settings, allowing you to see how changes to shutter speed, aperture, and ISO will affect the final image.
- Benefit: This feature helps you achieve the desired exposure before taking the shot, reducing the need for multiple test shots and adjustments.
-
Grid Display and Guidelines
- Description: EOS Utility offers grid overlays and composition guidelines that can be displayed on the live feed. These grids help you align your shots according to photographic principles like the rule of thirds.
- Benefit: Using grids and guidelines aids in composing balanced and visually appealing photographs, especially for architectural, landscape, and other structured shots.
-
Histogram and Exposure Indicators
- Description: You can view histograms and exposure indicators in real-time while using Live View. This allows you to monitor and adjust exposure levels dynamically.
- Benefit: These tools help ensure that you avoid overexposed or underexposed areas in your images, contributing to better exposure control and image quality.
-
Image Review and Comparison
- Description: After capturing an image, you can immediately review it on the computer screen. EOS Utility allows for quick comparisons between shots.
- Benefit: This feature speeds up the process of evaluating and selecting the best images, especially useful for reviewing multiple shots in a shoot or making adjustments on the spot.
-
Live View Recording (for video)
- Description: If your camera supports video recording, EOS Utility allows you to start and stop recording from the computer. The live video feed is displayed on the screen.
- Benefit: This feature is beneficial for video production, where remote control and real-time monitoring are essential for capturing high-quality footage.
Benefits of Using Live View Shooting in EOS Utility
-
Precision and Accuracy
- Enhanced Framing: Live View allows you to see the exact composition of your shot on a larger screen, which makes it easier to frame your subject accurately. This is especially useful for complex compositions or when working with intricate details.
- Focus Accuracy: With Live View, you can use magnification tools to zoom in and fine-tune your focus with greater precision. This is particularly beneficial for macro photography or when focusing on small details.
-
Convenience in Studio Settings
- Remote Control: EOS Utility provides the ability to control your camera settings directly from your computer. You can adjust parameters like shutter speed, aperture, and ISO without having to touch the camera, which is ideal for studio environments where the camera might be on a tripod or in a hard-to-reach position.
- Instant Feedback: You can immediately see how changes to settings affect the exposure and composition in real-time. This reduces the need for trial-and-error shooting and allows for quicker adjustments.
-
Streamlined Workflow
- Direct Tethering: By connecting your camera to your computer, you can view and manage your images as they are captured. This can streamline your workflow, particularly in professional settings where immediate review and editing are crucial.
- Image Review and Management: You can easily review and organize your images on the computer screen, allowing for quicker decisions about which shots to keep or discard.
-
Enhanced Composition Tools
- Grid Display and Guidelines: Live View in EOS Utility often includes tools like grid lines or aspect ratio guidelines, which help in composing your shots more effectively. This can be especially useful for aligning subjects according to compositional rules like the rule of thirds.
- Real-Time Exposure Simulation: You can see a live simulation of how different exposure settings will affect your image, which helps in achieving the desired look without having to take multiple test shots.
-
Improved Ergonomics
- Comfortable Viewing: Viewing your camera’s live feed on a computer screen can be more comfortable than looking through a small viewfinder, particularly for extended shooting sessions or when shooting at awkward angles.
- Reduced Physical Strain: When using a computer to control the camera, you can make adjustments without constantly moving around or reaching for camera controls, which can reduce physical strain and fatigue.
-
Versatility for Different Photography Styles
- Macro Photography: Live View is invaluable for macro photography, where precise focusing is crucial. The ability to zoom in and fine-tune focus on a large screen makes it easier to capture sharp, detailed close-ups.
- Product Photography: For product photography, where composition and lighting are critical, Live View allows you to make real-time adjustments and ensure that every detail is captured perfectly.
-
Support for Video Recording
- Video Monitoring: If your camera supports video recording, Live View can be used to monitor the video feed on your computer screen. This helps in ensuring proper framing and focus throughout the recording process.
Limitations of Live View Shooting
1. Battery Consumption
- High Power Usage: Live View Shooting generally consumes more battery power compared to traditional viewfinder shooting. This is because the camera’s LCD screen is constantly active, and additional power is needed to maintain the live feed and process real-time data.
- Shorter Battery Life: Users may experience a shorter battery life, which can be problematic during extended shooting sessions. Carrying extra batteries or having access to a power source can help mitigate this issue.
2. Heat Generation
- Increased Heat: Continuous use of Live View can lead to the camera generating more heat. This is due to the prolonged operation of the camera’s sensors and screen.
- Potential Overheating: In some cases, especially with high-resolution or high-frame-rate shooting, the camera may overheat. This can cause the camera to shut down temporarily to prevent damage. It’s advisable to monitor the camera’s temperature and allow it to cool down if needed.
3. Lag and Delay
- Real-Time Lag: While Live View provides a real-time preview, there can still be a slight delay between the live feed on the screen and the actual capture. This lag can vary depending on the camera model and the complexity of the scene.
- Impact on Fast Action Shots: For fast-moving subjects or high-speed photography, this delay might affect the timing and accuracy of capturing the perfect moment.
4. Reduced Autofocus Speed
- Slower Autofocus: Live View typically uses contrast-detection autofocus, which can be slower compared to phase-detection autofocus used in the viewfinder mode. This slower focusing speed can be a limitation for fast-paced shooting scenarios.
- Accuracy Issues: In low-light or high-contrast situations, the autofocus performance may be less accurate or slower, impacting the overall quality of the shots.
5. Display Quality and Size
- Screen Resolution: The quality of the live feed depends on the camera’s LCD screen resolution. Lower resolution screens may not provide the sharpest preview, potentially affecting composition and focus.
- Screen Size: For detailed work, the size of the LCD screen might not always be sufficient for precise adjustments, although connecting to a larger external monitor can help alleviate this issue.
6. Distraction and Comfort
- Screen Distraction: Looking at the camera’s LCD screen for extended periods can be less comfortable compared to using the viewfinder, especially in bright conditions where screen visibility may be reduced.
- Ergonomics: The ergonomic feel of holding the camera with the screen in constant use may be less natural for some photographers, potentially affecting their shooting experience.
Practical Applications
1. Studio Photography
- Controlled Environment: In a studio setting, Live View allows for precise control over camera settings while viewing the results in real-time. Photographers can adjust lighting, composition, and camera angles directly from their computer, reducing the need to constantly adjust the camera.
- Preview Adjustments: Live View enables photographers to see how changes in lighting or settings affect the image before taking the shot. This is particularly useful for achieving consistent results in a studio environment.
2. Product Photography
- Detail and Precision: For product photography, where details are crucial, Live View helps in achieving accurate focus and composition. Photographers can use the computer screen to inspect product details and ensure everything is perfectly aligned and in focus.
- Tethered Shooting: Live View allows for tethered shooting, where images are automatically transferred to the computer. This streamlines the workflow, making it easier to review and select the best shots on a larger screen.
3. Macro Photography
- Close-Up Focus: Macro photography involves capturing extreme close-ups of small subjects. Live View is invaluable here as it provides a magnified view of the subject, helping photographers achieve precise focus on tiny details.
- Focus Peaking: Many Live View systems offer focus peaking or similar features that highlight in-focus areas, making it easier to ensure critical details are sharp in macro shots.
4. Video Recording
- Live Monitoring: When recording videos, Live View allows photographers to monitor the scene in real-time on a larger screen. This can help in adjusting focus, framing, and other settings without needing to look through the camera’s viewfinder.
- Composition and Framing: For video work, Live View helps in maintaining consistent composition and framing, especially when working with complex scenes or when the camera is mounted on a tripod or rig.
5. Remote Shooting
- Convenience: Live View enables remote shooting, where the camera can be controlled from a distance. This is particularly useful for situations where the photographer needs to be away from the camera, such as wildlife photography or self-portraits.
- Interactive Sessions: It allows for interactive sessions where clients or team members can see live feedback and make real-time decisions on adjustments, ensuring that everyone is aligned with the creative vision.
Conclusion
In conclusion, Live View Shooting in EOS Utility significantly enhances the photography experience by providing a real-time preview of your shots directly on your computer screen. This feature allows for precise control over camera settings, accurate focusing, and improved composition through on-screen tools and guidelines. It is particularly beneficial for studio work, macro photography, and any situation where exact framing and focus are crucial. By leveraging the advantages of Live View, photographers can achieve greater accuracy and efficiency, making it an invaluable tool in both creative and technical shooting scenarios.