
The introduction is the first section of the content and sets the stage for the reader. It should provide a brief yet compelling overview of EOS Utility, giving the reader a clear idea of what to expect from the article. Here’s what to include:
- Brief Overview of EOS Utility: Start with a concise explanation of what EOS Utility is. Mention that it is a software application developed by Canon specifically for its EOS series of cameras. Highlight its primary function, which is to enable photographers to remotely control their cameras and manage images directly from a computer.
- Purpose and Importance for Canon Users: Explain why EOS Utility is important for Canon camera users. Discuss its role in enhancing the photography workflow by providing features like remote shooting, image transfer, and camera settings configuration. Emphasize how the software helps photographers save time and achieve more precise control over their photography, making it an essential tool for both amateur and professional photographers.
What is EOS Utility?
EOS Utility is a software application developed by Canon that allows users to control and manage their Canon EOS digital cameras from a computer. This tool is essential for photographers who want to streamline their workflow by remotely operating their camera, transferring images, and adjusting camera settings directly from their desktop or laptop.
Key Functions of EOS Utility:
- Remote Shooting: EOS Utility enables users to control their camera from a distance using a computer. This is particularly useful in studio photography or situations where the camera needs to be positioned in a hard-to-reach spot. Users can adjust settings like shutter speed, aperture, and ISO, and trigger the shutter remotely.
- Image Transfer: The software facilitates easy and direct transfer of images from the camera to the computer. This can be done either automatically as images are captured or manually, depending on the user’s preference.
- Camera Settings Configuration: EOS Utility provides an interface for users to adjust and customize various camera settings, such as picture style, white balance, and autofocus modes, directly from their computer. This is especially convenient for fine-tuning settings without touching the camera.
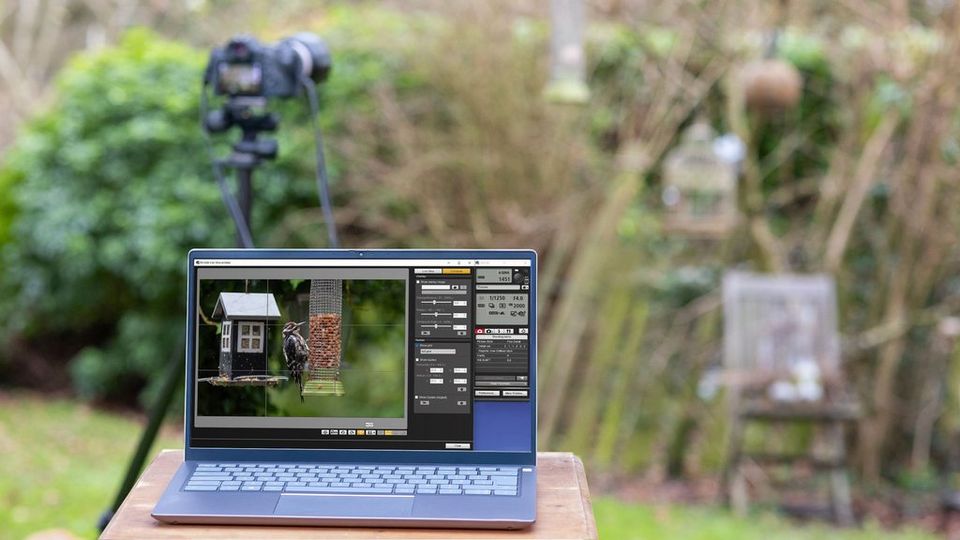
- Live View Shooting: With EOS Utility, photographers can view a real-time display of what the camera’s lens is capturing on their computer screen. This feature is beneficial for composing shots, particularly in tethered shooting setups.
- Firmware Updates: EOS Utility also plays a critical role in updating the firmware of Canon cameras. Keeping the camera’s firmware up to date ensures that it operates efficiently and with the latest features and bug fixes provided by Canon.
Key Features of EOS Utility
1. Remote Shooting
- Description: EOS Utility allows users to control their Canon camera remotely from a computer. This feature is particularly useful for studio photography, product shoots, and situations where the camera needs to be positioned in a hard-to-reach place.
- How It Works: The camera is connected to the computer via USB or Wi-Fi. Photographers can then adjust settings, focus, and even trigger the shutter directly from the computer.
- Benefits: Remote shooting provides greater control, reduces camera shake (especially in macro photography), and allows photographers to interact with the subject without being behind the camera.
2. Image Transfer
- Description: EOS Utility streamlines the process of transferring images from the camera to a computer. This can be done either automatically or manually, depending on user preference.
- How It Works: As images are captured, they can be immediately transferred to the connected computer, where they can be reviewed, edited, or archived.
- Benefits: This feature speeds up workflow by eliminating the need for memory card readers and ensures that images are backed up quickly.
3. Camera Settings Configuration
- Description: The software allows users to access and modify camera settings directly from their computer. This includes settings such as ISO, aperture, shutter speed, white balance, and more.
- How It Works: Through EOS Utility’s interface, photographers can see all the settings available on their camera and adjust them in real-time without touching the camera itself.
- Benefits: This is particularly useful in studio settings where photographers might want to adjust settings without disrupting the scene. It also provides a larger, more detailed view of settings compared to the camera’s built-in display.
4. Live View Shooting
- Description: EOS Utility provides a live feed from the camera’s sensor to the computer, enabling photographers to compose and focus their shots using the computer screen.
- How It Works: When Live View is activated, the camera’s viewfinder image is displayed on the computer. Users can focus manually or automatically, adjust exposure, and trigger the shutter, all while viewing the scene on a larger screen.
- Benefits: This feature is beneficial for precise composition, especially in macro photography, portrait sessions, and other scenarios where detail is crucial. It also aids in making fine adjustments before taking the shot.
5. Firmware Updates
- Description: EOS Utility simplifies the process of updating the camera’s firmware, ensuring that the device is running the latest software for optimal performance.
- How It Works: The software notifies users when a firmware update is available. Users can download the update through EOS Utility and apply it directly to the camera.
- Benefits: Keeping the firmware up-to-date is essential for maintaining camera performance, adding new features, and fixing bugs. EOS Utility makes this process straightforward and user-friendly.
6. Other Notable Features
- Customization Options: EOS Utility allows users to create and save custom shooting profiles, which can be quickly applied during different sessions.
- Compatibility with Other Canon Software: EOS Utility integrates seamlessly with other Canon software, such as Digital Photo Professional (DPP), providing a complete workflow solution from shooting to editing.
System Requirements
Understanding the system requirements for EOS Utility is crucial for ensuring smooth installation and optimal performance. Below is a detailed explanation of the key system requirements:
1. Supported Operating Systems
- Windows
- Versions: EOS Utility typically supports Windows 10 and Windows 11. Some older versions might also support Windows 7 and 8, but newer updates may be limited to the latest Windows operating systems.
- Architecture: Both 32-bit and 64-bit versions of Windows are usually supported, but recent versions may only support 64-bit systems.
- macOS
- Versions: EOS Utility is compatible with several macOS versions, including the most recent releases. Compatibility may vary depending on the specific version of the software and the version of macOS.
- Architecture: Typically supports only 64-bit macOS systems, as Apple has transitioned away from 32-bit applications.
2. Hardware Requirements
- Processor
- A modern, multi-core processor is recommended for optimal performance. This ensures smooth operation, especially when handling high-resolution images or using the Live View feature.
- Memory (RAM)
- Minimum: 2 GB of RAM is often the minimum required, though 4 GB or more is recommended for better performance, especially when running multiple applications alongside EOS Utility.
- Recommended: 8 GB or more for advanced users working with large files or in professional environments.
- Storage
- Free Disk Space: A minimum of 500 MB to 1 GB of free disk space is typically required for installation. Additional space may be necessary for storing transferred images and video files.
- Display
- A monitor with at least 1024 x 768 resolution is recommended. Higher resolution displays (e.g., Full HD or 4K) offer a better user experience, particularly for editing and reviewing images.
3. Compatible Canon Camera Models
- EOS Series
- EOS Utility is primarily designed for Canon EOS series cameras, including DSLRs and mirrorless models. Specific models supported may vary depending on the version of the software.
- PowerShot Series
- Some higher-end PowerShot models are also compatible with EOS Utility, although functionality might be more limited compared to EOS cameras.
- Check Compatibility: It’s important to check the Canon website or the software documentation to ensure that your specific camera model is supported by the version of EOS Utility you plan to use.
4. Peripheral Requirements
- USB Connection
- A USB 2.0 or higher port is necessary for connecting the camera to the computer. Using the original Canon USB cable is recommended for stable connections.
- Internet Connection
- An internet connection may be required for downloading the software, updates, and drivers. Additionally, it’s necessary for checking for firmware updates.
How to Install and Set Up EOS Utility
Installing and setting up EOS Utility is a straightforward process, but it’s essential to follow the steps carefully to ensure the software works correctly with your Canon camera. Here’s a detailed guide:
Step 1: Download EOS Utility
- Visit the Canon Support Website:
- Go to the official Canon website.
- Navigate to the “Support” section.
- Select Your Camera Model:
- Enter your Canon camera model in the search bar or select it from a list.
- This will ensure you download the correct version of EOS Utility compatible with your camera.
- Download EOS Utility:
- Look for the EOS Utility software in the list of available downloads.
- Select the latest version and click on the download link.
- Save the installation file to your computer.
Step 2: Install EOS Utility
- Locate the Downloaded File:
- Once the download is complete, find the installer file on your computer, usually in the “Downloads” folder.
- Run the Installer:
- Double-click the installation file to start the installation process.
- Follow the on-screen prompts to proceed with the installation.
- Choose the installation directory (default is usually recommended).
- Complete the Installation:
- Continue following the prompts until the installation is complete.
- Once finished, EOS Utility will be installed on your computer.
Step 3: Connect Your Camera
- Prepare Your Camera:
- Turn off your Canon camera.
- Insert a fully charged battery to ensure there’s no interruption during setup.
- Connect via USB:
- Use the USB cable provided with your camera to connect it to your computer.
- Ensure the connection is secure on both ends.
- Turn On Your Camera:
- Switch on your camera. The EOS Utility software should automatically launch on your computer.
Step 4: Initial Setup and Configuration
- Launch EOS Utility:
- If EOS Utility doesn’t launch automatically, open it manually from your computer’s applications or start menu.
- Choose Your Desired Function:
- The software will display several options such as “Download Images,” “Remote Shooting,” or “Camera Settings.”
- Select the function you want to start with.
- Configure Settings:
- Depending on the function you select, you may need to configure additional settings.
- For example, if you choose “Remote Shooting,” you can adjust camera settings like ISO, shutter speed, and aperture directly from your computer.
- Save Your Settings:
- After configuring everything, save your settings within the software.
- This will make it easier to use the software with the same configuration in the future.
Step 5: Test the Setup
- Take a Test Shot:
- If you’ve set up EOS Utility for remote shooting, take a test shot to ensure everything is working correctly.
- Check the image transfer process to verify that images are being saved to your computer as expected.
- Explore Additional Features:
- Explore other functions of EOS Utility, such as live view shooting or firmware updates, to familiarize yourself with the software.
Step 6: Troubleshooting (if needed)
- Connection Issues:
- If the software doesn’t recognize your camera, ensure that the USB cable is securely connected and the camera is turned on.
- Try a different USB port or cable if the problem persists.
- Software Not Launching:
- Ensure that EOS Utility is installed correctly. Reinstall the software if necessary.
- Camera Compatibility:
- Confirm that your camera model is supported by the version of EOS Utility you’ve installed.
Using EOS Utility: A Step-by-Step Guide
This section will provide a detailed walkthrough on how to use EOS Utility for various tasks. The steps will be broken down by the main features of the software to ensure that users can easily follow along.
1. Launching EOS Utility
- Step 1: Ensure that your Canon camera is connected to your computer via USB cable or Wi-Fi (if your camera supports it).
- Step 2: Power on the camera.
- Step 3: Open EOS Utility on your computer. The software should automatically detect your camera and present the main menu with options.
2. Remote Shooting
- Step 1: In the EOS Utility main menu, select “Remote Shooting.”
- Step 2: The Remote Live View window will open, displaying what the camera sees in real time.
- Step 3: Adjust camera settings (aperture, shutter speed, ISO, etc.) directly within the Remote Live View window.
- Step 4: To focus, click on the desired area in the Live View window or use the autofocus buttons.
- Step 5: Click the shutter button in the Remote Live View window to capture the image. The image will be saved to both the camera and the connected computer.
3. Image Transfer
- Step 1: After capturing images, return to the main EOS Utility menu.
- Step 2: Select “Download Images to Computer.”
- Step 3: Choose “Select and Download” to manually select which images to transfer or “Start Automatic Download” to transfer all images.
- Step 4: Specify the destination folder on your computer where the images will be saved.
- Step 5: Click “Download” to begin the transfer process.
4. Configuring Camera Settings
- Step 1: From the main menu, choose “Camera Settings/Remote Shooting.”
- Step 2: In the Camera Settings window, adjust settings such as image quality, white balance, and custom shooting modes.
- Step 3: Changes made in the software will be applied instantly to the camera.
5. Live View Shooting
- Step 1: From the main menu, select “Remote Shooting.”
- Step 2: In the Remote Live View window, click “Live View” to activate it.
- Step 3: Use the Live View screen to compose your shot, making any necessary adjustments to settings.
- Step 4: Focus and capture the image as described in the Remote Shooting section.
6. Firmware Updates
- Step 1: Ensure your camera’s battery is fully charged or connected to an AC adapter.
- Step 2: Download the latest firmware update from Canon’s official website and save it to your computer.
- Step 3: In EOS Utility, go to the “Camera Settings” option.
- Step 4: Select “Firmware Update” and follow the on-screen instructions to load the firmware file from your computer to the camera.
- Step 5: Confirm the update and wait for the process to complete. Do not turn off the camera during the update.
7. Tips and Best Practices
- Tip 1: Always ensure that your camera’s firmware and EOS Utility are up-to-date to avoid compatibility issues.
- Tip 2: Use a high-speed USB cable or a reliable Wi-Fi connection to prevent interruptions during image transfer or remote shooting.
- Tip 3: Regularly back up your images to an external drive or cloud service to safeguard your work.
Common Issues and Troubleshooting
1. Connection Issues
- Problem: EOS Utility doesn’t recognize or connect to the camera.
- Possible Causes:
- Faulty or incompatible USB cable.
- Outdated EOS Utility version.
- Camera is not set to the correct mode for connection.
- Solutions:
- Ensure you’re using the original or a high-quality USB cable.
- Update EOS Utility to the latest version.
- Check the camera settings to ensure it’s in the right mode for connection (e.g., ‘PC Connect’ mode).
- Restart both the camera and the computer.
- Possible Causes:
2. Software Crashes or Freezes
- Problem: EOS Utility crashes or becomes unresponsive during use.
- Possible Causes:
- Compatibility issues with the operating system.
- Insufficient system resources (RAM, CPU).
- Conflicts with other software running simultaneously.
- Solutions:
- Make sure your operating system is compatible with the EOS Utility version.
- Close unnecessary programs to free up system resources.
- Reinstall EOS Utility to ensure a clean installation.
- Check for system updates or patches that might resolve compatibility issues.
- Possible Causes:
3. Slow Image Transfer
- Problem: Image transfer from the camera to the computer is slower than expected.
- Possible Causes:
- Using an older or lower-speed USB port (e.g., USB 2.0 instead of USB 3.0).
- Large file sizes or transferring many files at once.
- Background processes consuming bandwidth.
- Solutions:
- Use a USB 3.0 port for faster transfer speeds.
- Transfer images in smaller batches to avoid overwhelming the system.
- Disable or pause background processes or downloads that may be slowing down the transfer.
- Possible Causes:
4. Live View Not Working
- Problem: The Live View feature doesn’t activate or work properly.
- Possible Causes:
- Incompatible camera model or firmware.
- USB connection issues.
- Incorrect camera settings or mode.
- Solutions:
- Verify that your camera model supports Live View with EOS Utility.
- Ensure the camera’s firmware is up to date.
- Reconnect the USB cable and restart EOS Utility.
- Double-check the camera’s mode and settings (e.g., ensure it’s not in Movie mode if Live View is needed for stills).
- Possible Causes:
5. Firmware Update Failures
- Problem: The firmware update process fails or encounters errors.
- Possible Causes:
- Interrupted connection during the update.
- Incorrect firmware file or version.
- Insufficient battery level on the camera.
- Solutions:
- Ensure a stable connection between the camera and computer during the update.
- Download the correct firmware version from the official Canon website.
- Make sure the camera battery is fully charged before starting the update.
- Possible Causes:
6. Camera Settings Not Saving
- Problem: Changes made to the camera settings via EOS Utility are not saved.
- Possible Causes:
- Connection instability.
- Incompatible or outdated EOS Utility version.
- Solutions:
- Reconnect the camera and try adjusting the settings again.
- Update EOS Utility to ensure compatibility with your camera model.
- Check if the camera has write protection enabled, which might prevent changes.
- Possible Causes:
7. Error Messages
- Problem: Receiving error messages during operation.
- Possible Causes:
- Specific errors related to connection, software version, or compatibility.
- Solutions:
- Refer to the error code or message and consult the EOS Utility manual or Canon support site for specific solutions.
- Common fixes include restarting the software, reconnecting the camera, or reinstalling EOS Utility.
- Possible Causes:
8. Compatibility Issues with Operating Systems
- Problem: EOS Utility doesn’t work correctly after an OS update.
- Possible Causes:
- OS update might have caused compatibility issues.
- EOS Utility version might not be optimized for the latest OS.
- Solutions:
- Check for any available updates or patches for EOS Utility that address compatibility with the new OS version.
- If no update is available, consider rolling back the OS update if possible or using a different computer until an update is released.
- Possible Causes:
EOS Utility offers several advantages for photographers, particularly those who use Canon cameras. Below are some key benefits:
1. Enhanced Remote Shooting Capabilities
- Full Control from a Distance: EOS Utility allows photographers to control their camera remotely using a computer. This is particularly useful in studio settings, wildlife photography, or any situation where being physically close to the camera might disrupt the shot.
- Live View Functionality: The live view mode enables real-time monitoring of what the camera sees, allowing for precise framing and focusing. This feature is essential for capturing high-quality images, especially when shooting macro or product photography.
2. Efficient Image Transfer
- Seamless Image Downloading: With EOS Utility, images can be automatically transferred from the camera to the computer as they are taken. This feature streamlines the workflow, saving time and reducing the risk of data loss.
- Batch Downloading: Photographers can quickly download all images from the camera to the computer, which is especially useful after a long shoot or when working with large volumes of images.
3. Convenient Camera Configuration
- Easy Access to Camera Settings: EOS Utility provides an intuitive interface to adjust camera settings directly from a computer. This includes exposure settings, white balance, picture style, and more. It’s especially handy in studio environments where the camera might be out of reach.
- Custom Settings and Presets: Users can save custom settings and apply them quickly, ensuring consistency across different shoots.
4. Streamlined Workflow
- Integration with Other Canon Software: EOS Utility works seamlessly with other Canon software like Digital Photo Professional (DPP) for a more integrated workflow. This allows for immediate post-processing and editing, enhancing overall productivity.
- Tethered Shooting: Photographers can review and edit images on the go, directly from the computer, allowing for immediate feedback and adjustments during the shoot.
5. Firmware Updates
- Easy Firmware Management: EOS Utility simplifies the process of updating the camera’s firmware. Keeping the firmware up-to-date ensures that the camera operates with the latest features and improvements, enhancing performance and fixing potential bugs.
6. Better Image Review and Selection
- Large-Screen Viewing: Images can be viewed on a larger computer screen immediately after capture, allowing for more detailed review and selection. This is particularly useful for ensuring critical focus, exposure, and composition before wrapping up a shoot.
- Immediate Client Feedback: In professional settings, clients can view images in real-time, providing immediate feedback and reducing the need for reshoots.
7. Support for Multiple Shooting Scenarios
- Versatility Across Different Photography Styles: Whether in portrait, landscape, wildlife, or product photography, EOS Utility provides tools that cater to a wide range of shooting scenarios, making it a versatile tool in any photographer’s toolkit.
- Reduced Physical Interference: Remote control and live view capabilities mean the photographer can avoid physically interacting with the camera during sensitive shoots, reducing the risk of camera shake and other disturbances.
8. Cost-Effective Solution
- No Additional Cost for Canon Users: EOS Utility is provided free of charge for Canon camera users, making it a cost-effective solution for enhancing camera functionality without the need for additional equipment or software.
Alternatives to EOS Utility
While EOS Utility is the official software provided by Canon for managing and controlling their cameras, there are several alternative applications that offer similar or enhanced functionalities. These alternatives can be particularly useful for users who seek additional features, a different user interface, or compatibility with non-Canon devices. Here’s a detailed explanation of some of the most popular alternatives to EOS Utility:
1. Adobe Lightroom
- Overview: Adobe Lightroom is a powerful photo editing and management software widely used by photographers. It includes tethered shooting capabilities that allow you to control the camera remotely, similar to EOS Utility.
- Key Features:
- Tethered shooting with live view and direct image import.
- Extensive photo editing tools and presets.
- Integration with Adobe’s cloud services for easy access and sharing.
- Advantages:
- Provides comprehensive photo editing and organization in one package.
- Supports a wide range of cameras beyond Canon.
- Considerations:
- Requires a subscription, which might be costly for some users.
2. Capture One
- Overview: Capture One is a professional-grade photo editing and tethering software known for its color grading tools and support for medium format cameras.
- Key Features:
- Advanced tethered shooting with customizable overlays.
- Superior color editing and grading capabilities.
- Batch processing and cataloging.
- Advantages:
- Excellent image quality with RAW processing.
- Supports a broad range of camera brands.
- Considerations:
- Steeper learning curve for beginners.
- Higher cost compared to some other software.
3. Helicon Remote
- Overview: Helicon Remote is designed for remote camera control with a focus on macro photography and focus stacking. It’s compatible with many DSLR and mirrorless cameras, including Canon models.
- Key Features:
- Remote control of exposure settings, focus, and shooting.
- Focus stacking automation for macro and landscape photography.
- Interval shooting and time-lapse creation.
- Advantages:
- Tailored for photographers needing precise focus control.
- Affordable compared to some professional software.
- Considerations:
- Limited editing capabilities; focuses more on capturing.
4. Darktable
- Overview: Darktable is an open-source photography workflow application and RAW developer that supports tethered shooting.
- Key Features:
- Tethered shooting with live view for supported cameras.
- Non-destructive editing and powerful RAW processing.
- Supports a wide range of file formats and cameras.
- Advantages:
- Free and open-source, making it accessible to all.
- Active community support and regular updates.
- Considerations:
- Interface may not be as polished as commercial alternatives.
- Some features may be less intuitive for beginners.
5. digiCamControl
- Overview: digiCamControl is a free and open-source software that offers extensive camera control features. It’s compatible with a range of DSLR and mirrorless cameras, including Canon.
- Key Features:
- Full remote control of camera settings.
- Live view and remote shutter release.
- Supports time-lapse, focus stacking, and bracketing.
- Advantages:
- Free and versatile with a wide range of supported cameras.
- Regular updates and community-driven development.
- Considerations:
- Interface may not be as user-friendly as commercial software.
- Some advanced features might require additional plugins or extensions.
Comparison with EOS Utility
- Ease of Use: EOS Utility is specifically designed for Canon cameras, ensuring seamless integration and ease of use. However, alternatives like Adobe Lightroom and Capture One offer more advanced features, albeit with a steeper learning curve.
- Features: While EOS Utility is focused on remote shooting, image transfer, and camera settings, alternatives often provide a broader range of functionalities, including advanced photo editing, tethered shooting, and better support for multi-brand workflows.
- Cost: EOS Utility is free with Canon cameras, while some alternatives, like Adobe Lightroom and Capture One, require paid subscriptions. Open-source options like Darktable and digiCamControl provide cost-effective alternatives.
When to Consider Alternatives
- Advanced Editing Needs: If you require more robust photo editing and color grading tools, software like Adobe Lightroom or Capture One might be more suitable.
- Multi-Camera Support: Photographers working with multiple brands or looking for broader camera support might prefer alternatives that are not tied to a specific manufacturer.
- Specific Use Cases: For niche photography areas, such as focus stacking or astrophotography, specialized tools like Helicon Remote may offer features that EOS Utility lacks.
Conclusion
In the conclusion, summarize the key points discussed about EOS Utility and reiterate its significance in enhancing the photography experience for Canon users. Highlight how EOS Utility streamlines the process of managing camera settings, transferring images, and performing remote shooting, making it an indispensable tool for photographers. Emphasize its role in improving workflow efficiency and its impact on the overall quality of the photographic output. Finally, encourage users to explore and make the most of the software’s features to fully leverage their Canon equipment, reinforcing its value as a critical component of their photography toolkit.